PLASTIC SURGEONS SERVING DALLAS, PLANO, SOUTHLAKE, AND NEARBY FORT WORTH, TEXAS
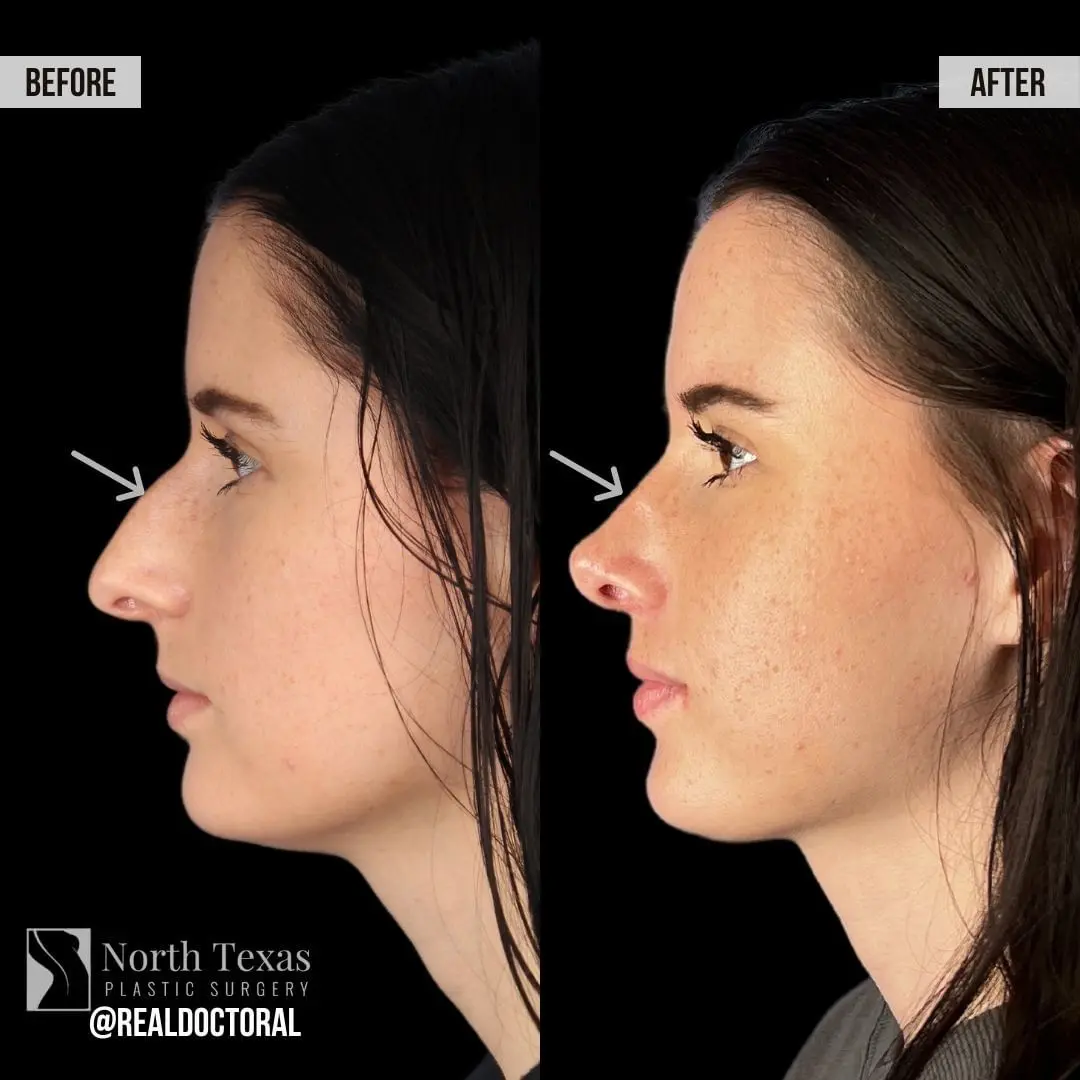
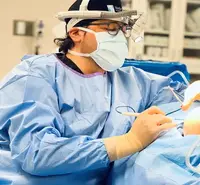
VIDEO TRANSCRIPTS: Getting things started this morning with a very beautiful rhinoplasty. What you’re gonna see that we’re gonna have to be doing for her is she’s got a real hump to her nose here; we definitely want to take this down. She also has a real bend to her nose. The bend to her nose is totally blocking off her airway and she’s really struggling to breathe out of the nose. So we’re going to make massive improvements there as well. Would like to refine the tip a little bit, make that a little bit smaller and more petite. And we also want to thin out the width of the nose which is also wide for her otherwise fine features. So this central part of the nose is called the columella. We make an incision that’s an inverted V to break up the scar there so that it’s very hard to find long term. You can see here is this white is cartilage and these are called the lower lateral cartilages and they meet down here in the middle of the columella. Actually inside the nostril and we actually come in between the skin and the cartilage here to help separate the skin from the underlying structure of the nose. So there are four basic parts to the structure of the nose. These are the lower lateral cartilages and they’re the first part of the structure of the nose and they form a dome. I like to compare them to the McDonald’s golden arches. These cartilages are what gives the tip of your nose shape. The pointier and thinner they are the pointier and thinner the tip of your nose will be. This instrument is called the oferic and we’ll introduce this into the nose to help lift the skin and fat up while we’re dissecting. So we’re now separating the two domes or the two lower lateral cartilages from each other to help give us exposure. The next critical structure in the nose; this piece of cartilage here is called the nasal septum. Now we’re gonna separate that septum from our other critical structure the upper lateral cartilages. You see as the septum and then the upper lateral cartilage on the side. Alright, let’s walk through that anatomy again. You have your lower lateral cartilage, your lower lateral cartilage, your septum, and then you have your upper lateral cartilage on this side, and your upper lateral cartilage on this side. You see this glistening white septal cartilage showing all the way down to the bottom of the nose. Start taking down the hump of the nose and we’re gonna use that with this special instrument called our angle septal scissors. Cartilage we’re removing to get rid of that hump. So we’ve taken out the cartilage portion of the hump, but as you notice there’s still a hump right here. That comes from the fourth critical structure that makes up the nose; the bone. We use this rasp now to take that boney hump down. Alright, now that we’ve taken down out the boney and the cartilaginous hump, look at that profile, beautiful. Alright, we’re gonna take out the piece of septum from the middle that we’re gonna use to reshape the rest of the nose. I’ll highlight now the bend that’s in her septum from her previous breaks in her nose. This is why her nose is not straight. This is the piece of the cartilage that we removed from the center of the nose. We’re now marking how we’re gonna divide it up so we can use it to make different structures. What you see is we’ve created three separate struts that we’re gonna then use to restructure the nose. You can think of the nasal airway like a tepee with the septum and the upper lateral cartilages here. This is called the internal nasal valve. Someone is having decreased airflow through this internal nasal valve, the fix for that is to pop that valve open. So we’re gonna create these struts that will open up the tepee and really open up the airflow through here. We saw in the last shot how the septum was all bent and curled, we’ve put our first strut here, securing it in place now look how nice and straight it is. Now I’ve added a second strut on the other side. These struts are so much thicker than the septum and there’s two of them, okay. This is gonna ensure that this nose is rock solid straight. I talked about that tepee to breathe, this is the outer leg of the tepee, the upper lateral cartilages. Having that strut in there that opens up that internal nasal valve is really gonna improve her breathing. This strut now, this is called a columeller strut. Remember this little central piece here is called the columella. So this strut helps hold and support the tip in its newly shaped position. So we’ve put that strut here down the middle and now we’ve done some suturing here to reshape the tip to make it much more fine at the very end. Starting to close the incisions, but don’t worry there’s still more action to come. So we’ve closed the nose, totally reshaped it, now the last thing left to do is she’s a little bit wide naturally through here. The fix for that is gonna be to break her nasal bones and bring them in. Open the nasal bone from here all the way to here which allows me with my finger to push it in. One thing you’ll notice is that my fingers are holding the nose with my left hand the entire time. And the reason is the very tip of my finger is feeling the edge of this chisel to know exactly where it is. Since you obviously can’t see what’s happening, this is where really having that connection between your mind and the instruments is critical. This is where having a really experienced rhinoplasty surgeon makes all the difference in the world. We completed the breaks it really allows us to narrow that bridge of the nose and thin it out. What a big difference. Here we fixed the hump on the nose, we’ve straightened it out, really opened up the airways, it’s a little bit more petite and refined, and really thinned the side of it for a fantastic result. This is what we’re gonna make the splint out of. And then we put pressure exactly where we want the bones to heal. You wear the splint for approximately a week.